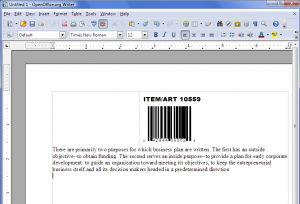
Open Office is an open source package that competes directly with Microsoft Office. Yes it not as powerful as MS Office, but in many occasions it is enough. And do not forget that it is free.
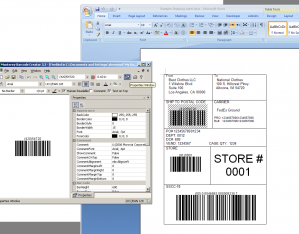
Adding Barcodes to Open Office is easy with Monterey Barcode Creator. Just drag and drop the barcode from Barcode Creator to the Writer.
The OO Writer seems to rasterize the object under screen resolution. As a result it looks not clear as the one in Microsoft Word. But this is just a cosmetic difference. When you print the document to the printer, or export to PDF, the barcode quality is as good as you get from Word.
Attachment: PDF document exported from OO Writer

Recently a customer asked us a question -
I have an emergency task. I have a spreadsheet with all product codes (tens of thousands of them). I need to print barcodes for them. I do not have an advanced IT system for this task. I want to print them one by one in Avery label papers. Do you have software doing that?
Small companies often have needs to print barcodes. But not many of them have dedicated IT systems for the purpose, or in-house programmers that can come up with a solution at any time. Some examples -
- You want to add a barcode into the invoices, so that you can find the invoice quickly. Your current software that prints invoices, Quickbooks, does not have the capability.
- You run a retail store and occasionally you bought some items with no UPC barcode on the box. You want to print UPC barcodes and stick them on the boxes by youself.
- You want to stick barcodes with special serial number encoded. In this way, you can check if the item returned by your customer was indeed sold from your store.
The first option is to use barcode fonts. A typical solution is to add a column in the spreadsheet that holds the barcode strings, and use Word Mail Merge to get the barcodes into the label paper (which is a Word document0. It does not require advanced programming knowledge. Unfortunately, many companies do not use VBA at all nowadays, and it seems to become a formidable task for many people.
Fortunately, Monterey Barcode Creator has a “batch printing” feature. You do not need any programming knowledge at all to print barcodes into label papers with this program.
Let’s assume that you have a speadsheet that lists all yor product codes in one column. You want to print sticks with barcodes on it, and each stick corresponds to one product code. You will then print them to Avery Label Paper 3111 on a laser printer. After stickers are printed, you stick them one by one on the item box.
CSV File
First of all, Monterey Barcode Creator can’t read Excel file directly. You will have to export to a .csv file. CSV is the abbreviation of Comma Separated Value, a format used to exchange data between software. Each line is a record, and column values are separate by commas. The below line is an example:
1003434323214, 0-20-ABC-2004, Product Item One
You can generate a .csv file by choosing “Save As” and specify .csv as the format.
As you can see from the example record, a line contain multiple columns. Columns are numbered from 1. Record your column number, you will need it soon.
You can also use Copy/Paste to paste the whole column to Notepad, and save it into a text file. This file can be thought as a special type of .CSV, as each record has only one column.
Adjusting Barcode Properties
Now start Monterey Barcode Creator. The images created by Barcode Creator can contain three parts - barcode, human readable text and a text comment. We do not need comment here so we uncheck “comment” box. Change the barcode type to “Code128″. You might want to change other properties, such as BarHeight and NarrowBarWidth. There are quite a number of properties that you can change. If you are interested, read the product manaul at http://mdn.morovia.com/manuals/mbc3/shared.properties_methods.php.
Remember that all barcodes will have the same property set (except the barcode and human readable text).
After you are satisfied with the barcode size, you can now print them out. From File Menu, choose Print.
Batch Printing in Barcode Creator
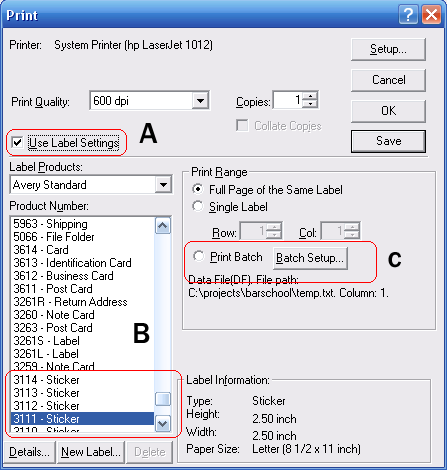
First, make sure that “Use Label Settings” is checked. If it is not checked, you will not see the bottom portion of the dialog. Use “Label Products” and “Product Number” to select the label paper you print on. The program has most paper listed, but if you can not find the one you have, you can enter it into the database by selecting “New Label…”. After you are done with the label paper selection, Click on Print Batch.
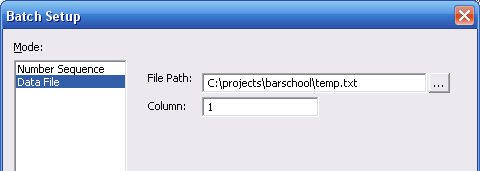
Monterey Barcode Creator supports two batch modes - Number Sequence and Data File. Number Sequence mode allows you to specify a sequence. For our work, we will use Data File mode. Click on the Data File to switch, and right side of the dialog will change accordingly. You will supply two parameters:
- File Path. This is the path of your CSV or Text file. You can use the small “…” button to navigate to the file, or type it by yourself.
- Column. The cardinal of the column that the data is from. If you pasted the data to a text file, you only have one column and it cardinal is 1.
Click OK to dismiss the setup dialog, and click OK on the Print Dialog to print out. If you have hundreds of thounds of records to print, it may take quite some time.
The data file we used for this article can be downloaded here. And the print result is here.
Nowadays manufacturers and importers are required by retailers to supply shipping container labels affixed to the cartons shipped to their warehouses. While it is a reasonable requirement from a retailer’s perspective, it is a burden for a small manufacturer that does not possess an advanced IT system. Many manufacturers ship to several national retailers only, and it does not make sense to spend tens of thousands on a labeling system. Fortunately with Monterey Barcode Creator, you can create labels easily from Microsoft Word.
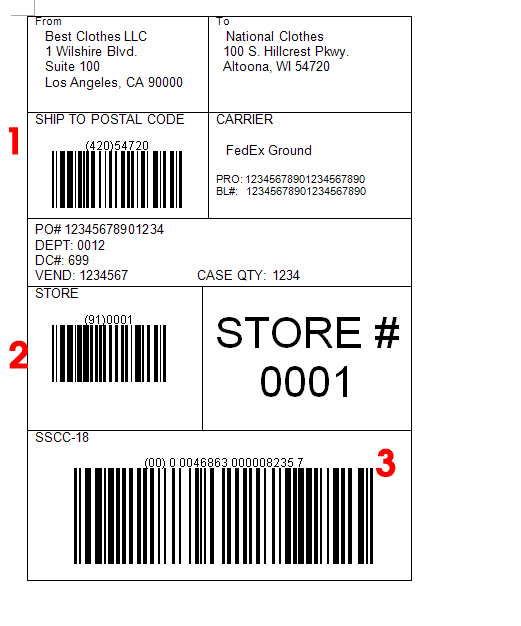
The image above shows a shipping label that meets the requirement of a national retailer. The whole label is 4″ X 6″. Most information in the label are quite obvious so we will not explain them here. The items that puzzle most are the three barcodes, required by the retailer for anyone doing business with. Those barcodes are actually not complicated as if they look at the first glance. All those barcodes are UCC/EAN-128 (also GS1-128) barcode. Their human readable texts all start with a number that is enclosed in parentheses. For example (420)54720. Here 54720 is the postal code, and 420 indicates that the data followed is a postal code.
Postal Code
The top barcode encodes the postal code (or zip code, USPS code etc.) of the retailer warehouse. Open Monterey Barcode Creator, and select “UCC/EAN-128″ as the barcode type. Change property TextOnTop to true so that human readable text appears on the top of the barcode. Turn off the comment - we do not need it. Set BarHeight to 500 (as the barcode is 1/2″ tall), and NarrowBarWidth to 15 (15 mils, 0.015 inch). Enter text as exactly as the one in the image: (420) 54720. After that you should get the barcode shown on the screen.
Now drag the barcode and drop it into Microsoft Word. Occasionally some people do not understand “drag and drop”. Here is the process: first move your mouse cursor on the barcode. Press you left mouse button. While holding this button, move the mouse cursor into Microsoft Word (you have to make sure that the Word window is visible at the beginning). Release the mouse button. The barcode enters Microsoft Word.
Better thing is, next time when you create a barcode with different data encoded, you do not need to repeat the process. Double click on the barcode in Word, the Barcode Creator Window will appear. From there you can modify properties of the barcode. The changes automatically go back to Word.
Store#
The barcode in the middle encodes store number - 0001 in our case. The process is similiar, except that you enter (91)0001 instead.
SSCC-18
Now comes the most critical barcode - SSCC18. This number and barcode are vital to the whole label, and you must proceed careful. If you are not familiar with this term, read this page first.
This number is used throughout the supply chain. It is not just for the shipment between you and the retailer’ warehouse. After the box is received, it will be delivered to regional warehouses, and front stores. The number identifies the box in all the process.
The number has three parts: (1) package type (the first digit). For cartons, it is 0. For pallets, it is 1. (2) Your GS1 number. (3) Serial number. The total length of (2) and (3) must be exact 16 digits. So if your GS1 number has 10 digits, you have 6 digits for the serial number. Lastly, the serial number must not repeat itself within one year period. It is your responsibility - recording it to a log is a good idea here. The last digit is the check digit, which is calculated based on the first 17 digits. You do not need to calculate manually, you can use the free utility here.
This bar code is usually bigger than other barcodes because of its importance. In the example labe, we use 20 as NarrowBarWidth, and 1000 as BarHeight. That means the barcode will have X dimension at 20 mils and the height is 1 inch.
If your shipping labels look similiar to the image above, you can simply download this file and modify by yourself. Note that you must have Monterey Barcode Creator 3.3 or above installed (trial is OK, but there is a watermark on the image) before you can change the barcodes.


